|
Learning to Cut With Scissors
|
 |
Choosing
a Pair of Scissors
When
a child is
first learning to cut with scissors, he or she is developing his or
her fine motor skills. One of the skills he or she must learn is to
separate of the two sides of the hand for skilled use of the hand..
This means the child is learning to use the thumb, index and middle
fingers together to manipulate objects or tools . He or she must
also learn to keep the ring and little fingers loosely tucked into
the palm of the hand. This part of the hand plays a crucial role in
providing stability for the dexterity fingers. So the best type of
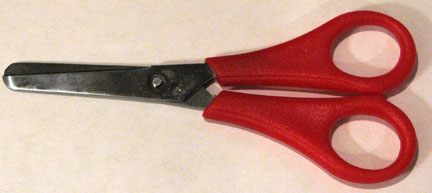
scissors to use are the “old fashioned” style of
scissors with
two loops of the same size.
Later
after the
child has developed separation of the two sides of the hand, using
scissors with an enlarged loop on the bottom is fine. This type of
scissors has the child use the ring finger in the bottom loop . This
gives the child greater hand strength on the scissors for cutting out
heavier materials.
|
|
 |
Positioning of the Body and Holding of the Scissors
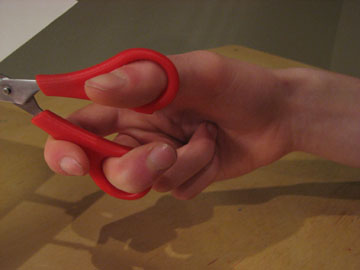
- Scissors should be held with in the top loop,
with the middle finger in the bottom loop. The index finger
is
placed on the outside to be free to guide the hand around curves
- Scissors should point away from the body, not
parallel to
stomach. Also the elbows should be positioned down, not up and
out.
- Scissors and work must remain below the
shoulders.
Scissors and work should be at least 8 to 12 inches from the face.
- The paper should be held by the
non-dominant hand
with the thumb on top. To
physically cue the child to use this position, give the paper to the
child held at a position above the child’s shoulder
level. As the
hand reaches
up, the
thumb will naturally move to the top of the paper. The hand holding the
paper should do most of the turning of the paper.
|
|
 |
Cutting
Techniques
- Here is the normal progression of cutting
skills:
snipping,
cutting on
a line, cutting simple shapes composed of lines (ie. squares,
rectangles, triangles, diamonds), cutting on gentle curves, increasing
curves and finally circles.
When
starting a new shape, be sure to start out with wide lines, say 1/4",
then move to thinner lines.
- For beginners start with snipping. Try
having the child cut
straws
into
pieces. Children love to see the pieces "pop" off and go
flying. For children that are having difficulties with
opening
and closing scissors, step back to practicing picking up manipulatives
with large tweezers first. Snipping on recipe cards also
works well for beginners. Cutting clay "snakes" into pieces in another
fun activty.
- Cutting shouldn't be introduced until the
child is
about
4 years of age. Before then, focus on playing with
manipulatives
(check fiirst, to make sure your chld isn't tempted to put them in his
or her mouth) and using large tweezers or
grabbers. At an early age, a safe and favorite fine motor
activity is dropping popcycle sticks into a can
with a hole cut in the lid. Also
see:
Fine Motor
Activities for Preschoolers for additional
ideas.
- Be aware of textures and weights of materials
that
are used
for
cutting practice. When children are just starting scissors
use,
they
will be more successful with thicker papers such as oak tag paper,
index cards and construction paper. After they develop skills
in
manipulating scissors move to further refinement on increasingly
lighter weight materials.
- Right handers should cut around a shape in a
counterclockwise direction to assure them of an unobstructed view of
the cutting line.
- Left handers should cut around in a clockwise
direction to
assure them of an unobstructed view of the cutting line.
Stop frequently to rest hands and shake out tight
muscles. Focus on having fun and taking time. |
©
2009 Carrie Lippincott, OTR/L
|